
Preface: the pain
Imagine you’re working in a team where multiple developers contribute to the same Git repository. Every time someone opens a pull request (PR), you need to ensure several things before approving it:
- Does the code run properly?
- Does the developer that opens the PR also adds proper testing functions for the changed code?
- Are there merge conflicts? (GitHub will auto check this for you)
- Did the changes break any existing functionality?
- Are there enough tests to cover edge cases?
Doing all of this manually takes time, increases the risk of human error, and slows down the development process.
🎯What is CI, and Advantages?
Now imagine having a tool that automatically checks these things every time someone pushes code — runs the tests, analyses the code quality, checks for conflicts, and alerts you only when something’s wrong. That’s where CI (Continuous Integration) comes in.
CI automates the process of building and testing code every time changes are made. It ensures issues are caught early, keeps your codebase healthy, and lets your team move faster and more confidently.
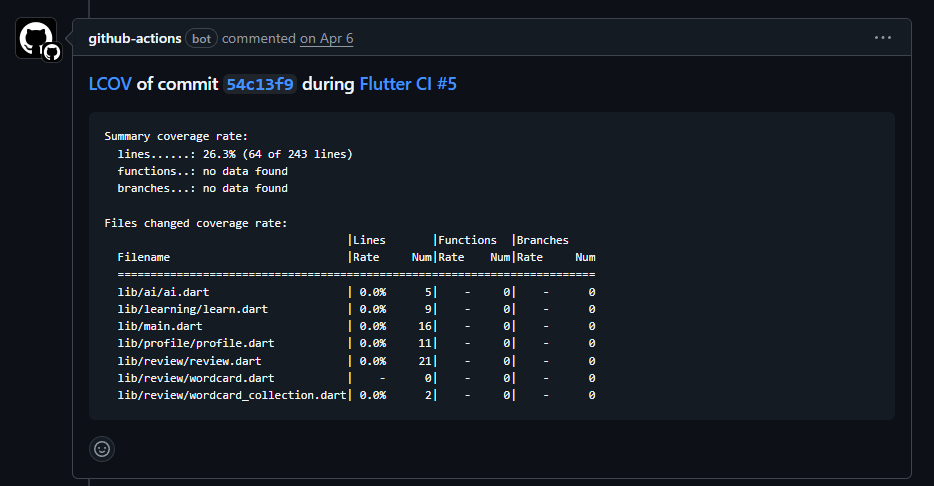
To be more clear: CI helps to run all the test functions that exists in the code base and generate test result and code coverage report for you, so you get a better understanding on the code status of the PR. It doesn’t generate new testing functions for you (you need another tool, e.g., LLM.). The screenshot below shows an example code coverage report for one of my Flutter projects (Well, my coverage rate is quite low😂. Anyway, just for demo 😉):
The concept of CI is independent of which programming language you use. Even though this article will use a Flutter project as example to demonstrate you how to configure CI setting, you can easily adapt the template below to any other languages (python, java etc.).
Let us now see how we can setup a CI in GitHub Actions that always automatically runs the test and generate a coverage report as a comment under the same Pull Request page. We will use Flutter as example, though the general concept remains the same..
✅ Prerequisites
Make sure you have:
- A Flutter project hosted on GitHub
- At least one widget or integration test file under
/testfolder, e.g.:
// test/demo_test.dart
// a dummy test function that test if str 'Wlecome' appears as one widget appeared in the app.
void main() {
  testWidgets('MyApp smoke test', (tester) async {
    await tester.pumpWidget(const MyApp());
    // add test here. Below gives one example.
    expect(find.text('Welcome'), findsOneWidget);
  });
}🦜Setup CI test for Flutter in GitHub Actions
Step 1: Write Some Tests
Before automating anything, ensure you have at least one test, e.g., a simple smoke test. These tests are what your CI workflow will run. An example can be found in the previous section (Prerequisites).
Step 2: Create Workflow File
In your repo, create .github/workflows/ci-build.yml (or test.yaml) to define your CI pipeline in GitHub Actions with the template code below.
The folder name should be set to .github/workflows/ since this is the folder where GitHub Actions detects workflow files (as what we are doing). GitHub will not run your workflow file if it’s located differently.
# Name of the workflow, which will be identified in GitHub Actions when the workflow is runned.
name: Flutter CI

# Trigger only for pull_request events that will be merged to main or develop branches.
on:
  pull_request:
    branches:
      - main
      - develop

jobs:
  build:
    runs-on: ubuntu-latest
    permissions:
      # Gives the action the necessary permissions for publishing new
      # comments in pull requests.
      pull-requests: write
      # Gives the action the necessary permissions for editing existing
      # comments (to avoid publishing multiple comments in the same PR)
      contents: write

    steps:
      # Pull the code
      - name: Checkout
        uses: actions/checkout@v4

      # Install flutter
      - name: Set up Flutter
        uses: subosito/flutter-action@v2
        with:
          channel: stable

      # Install packages of your flutter project
      - name: Install dependencies
        run: flutter pub get

      # Run the test
      - name: Flutter test
        run: |
          flutter test --coverage

      # Composite GitHub Action to setup LCOV.
      - name: Setup LCOV
        uses: hrishikesh-kadam/setup-lcov@v1

      # Configure coverage report setting and robot will write comment in PR.
      - name: Report Code Coverage
        uses: zgosalvez/github-actions-report-lcov@v4
        with:
          coverage-files: coverage/lcov.info
          # minimum-coverage: 80
          artifact-name: code-coverage-report
          github-token: ${{ secrets.GITHUB_TOKEN }}
          update-comment: true
It is worth mentioning that in this tutorial I use a plugin to report the code coverage: zgosalvez/github-actions-report-lcov@v4 (the final step). The plugin will scan the coverage-files and generate HTML style report as a comment in the Pull Request page, but this requests permissions, so it is why you need to git the github-token and at the early lines gives proper permissions to the workflow. The secrets.GITHUB_TOKEN is an environment secret that GitHub automatically knows, so you don’t need to do anything to generate this token.
Step 3: Commit & Push
Now git add the yaml file and your testing file(s), then commit and push them to your GitHub repository. Next, create a pull request that points to either main or develop branch. Afterwards, you will see that the workflow is triggered and you can check its status by going to the Actions tab and then find the workflow name.
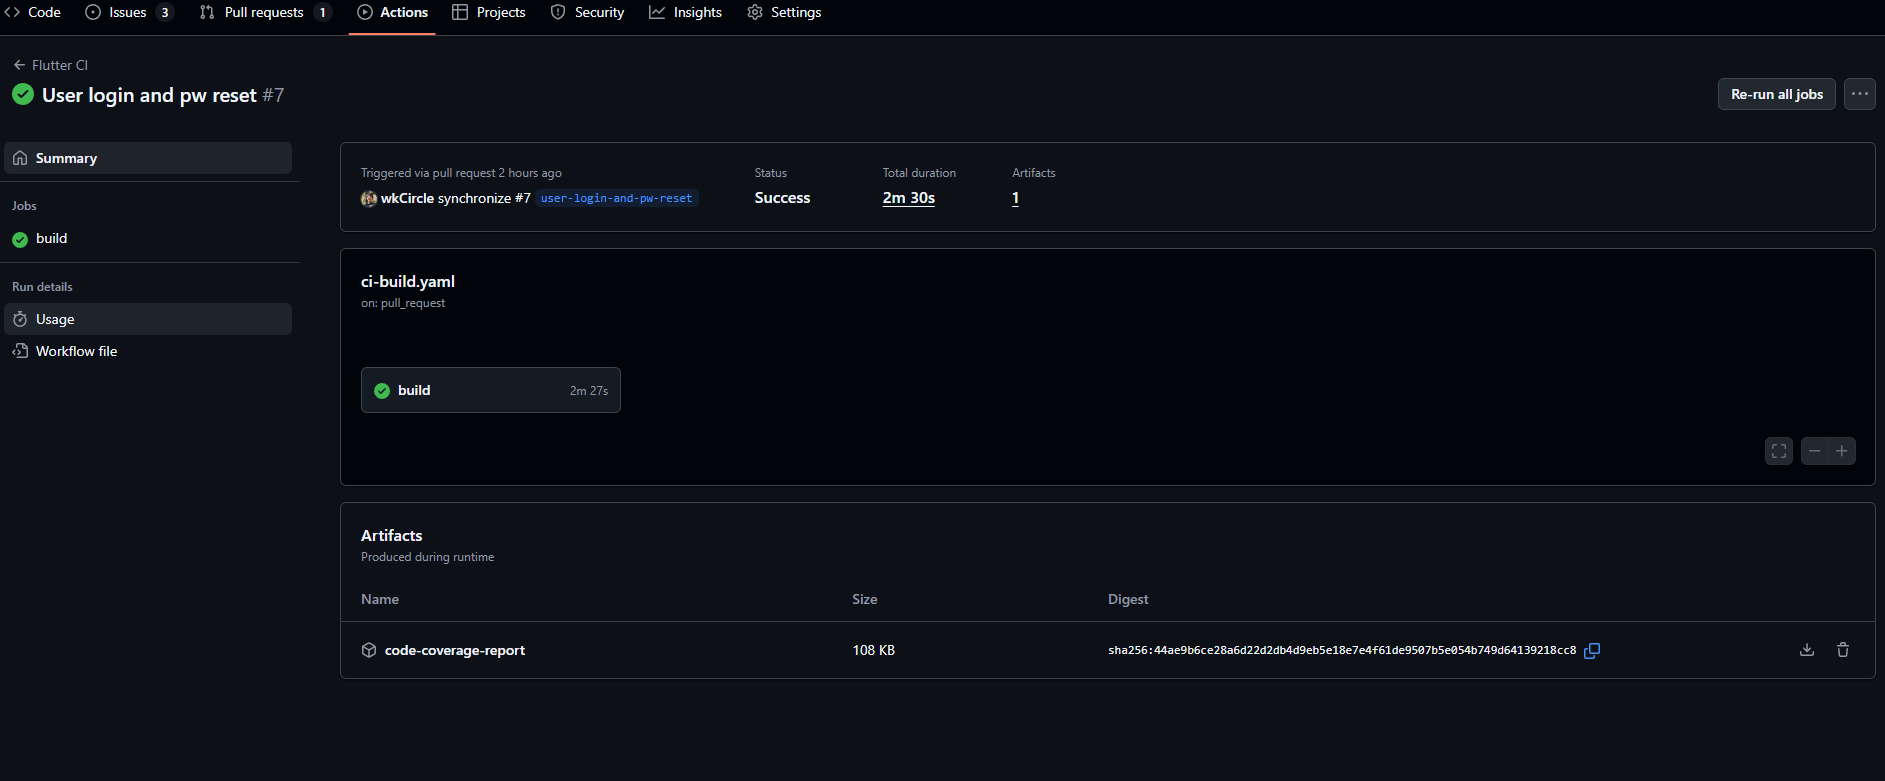
The following shows an example when a the job has been run successfully:
And if you go back to PR page, you will find the robot indeed has commented the code coverage report:
Congrats! You have successfully setup your CI workflow and now you can…
Addition: Need to read env file for credentials?
For some use cases, you might have a situation where at your local environment you have a .env file that stores sensitive information for your project to run. However, this file is not tracked in GitHub, yet the CI workflow might need it in order to run tests. How can we also give credentials for GitHub actions so they can run through? The answer is: add secrets in your GitHub repo.
Let’s see a practical example.
In my Flutter project I created an app that allows user to login and use my app. I use Supabase as my cloud database to store the data and query them when needed in my app. In this case, I need to give the Supabase credentials (stored in .env file) to my Flutter app, but I don’t upload .env file to GitHub. If I just directly use the template in the previous section (Setup CI test for Flutter in GitHub Actions), I will get the following error in any PR:

To fix the bug, we need to:
- Go to Settings tab ➡️ Secrets and variables/Actions ➡️ Click on Secrets ➡️Repository Secrets/New Repository Secret.
- In the pop-up window, gives the secret name and secret value ➡️ save the change.
- Repeat step 1-2 until you have added all secrets needed.
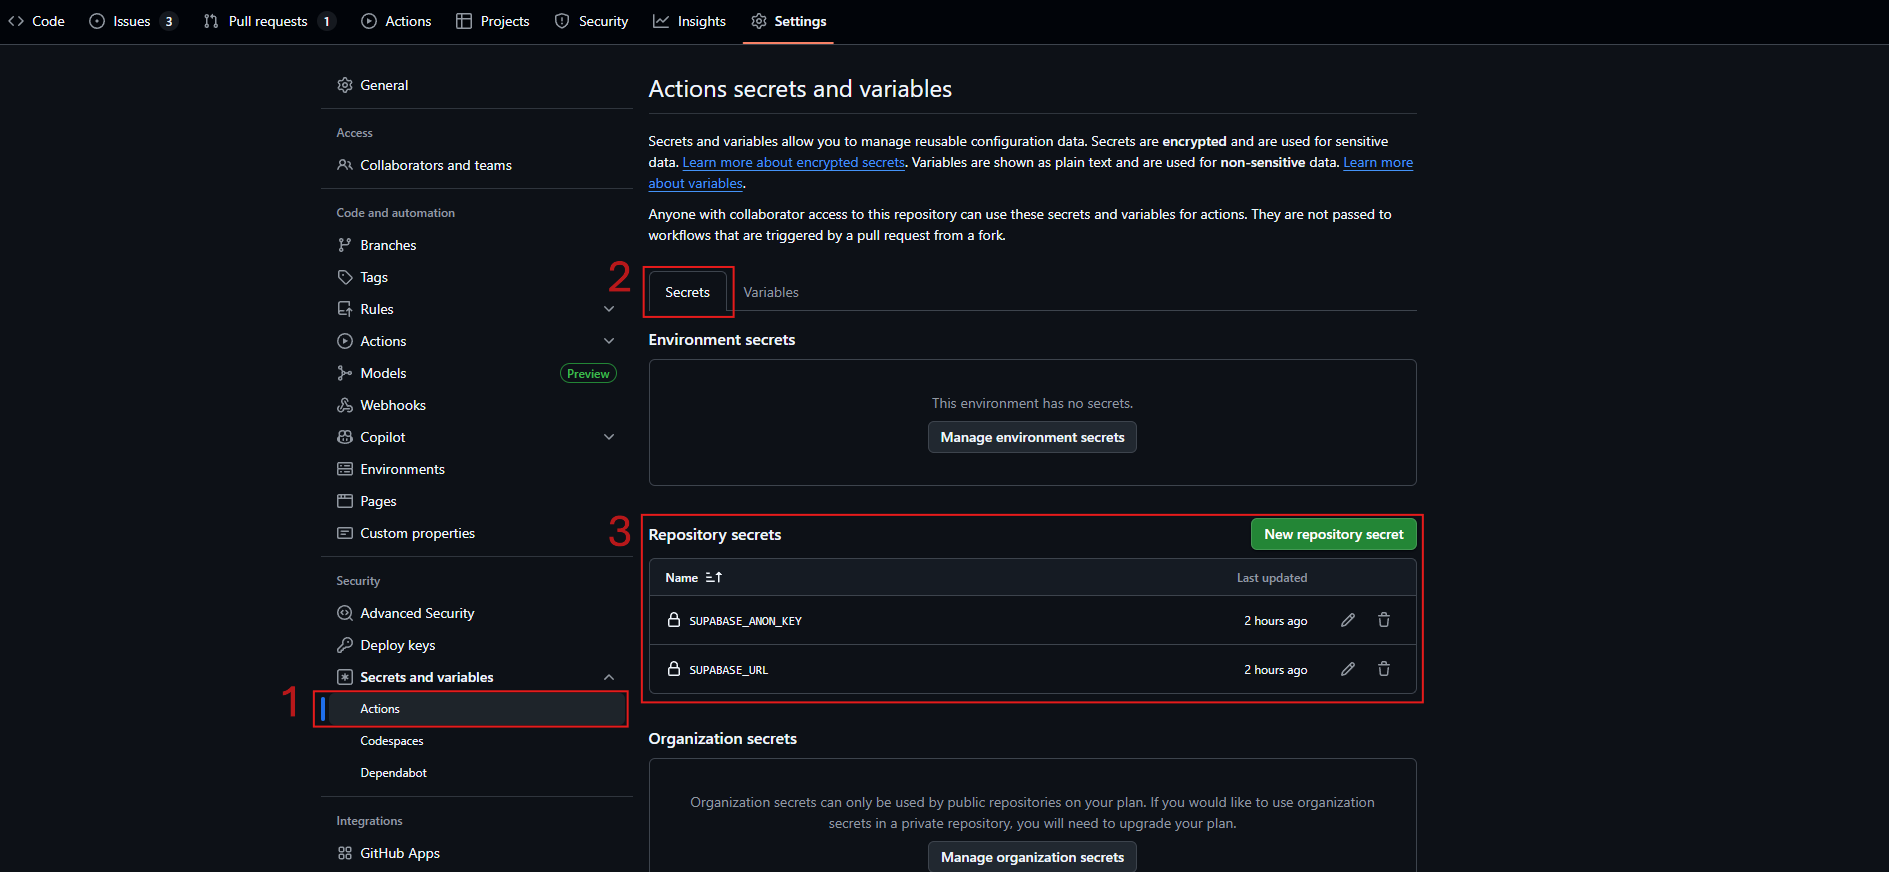
- Secrets vs Variables in GitHub:
- secrets: encrypted values used to store sensitive data like API keys and tokens. It won’t be revealed in GitHub console even in the yaml you try to echo or print it.
- variables: plain-text values used for configuration and can be revealed and edited.
- Environment vs Repository vs Organization secrets:
- Environment level secrets: are specific to a particular environment, such as production or staging. It might be used across repos given the same environment id.
- Repository level secrets: are specific to a particular repo. All workflows defined under the repo can access to the secrets.
- Organization secrets: highest level that any repo in the organization can access to its secrets.
For more details:
You also need to the following code, please insert it at line 36 in the yaml file before running the flutter test:
- name: Create env file
  run: |
    touch .env
    echo SUPABASE_URL=${{ secrets.SUPABASE_URL }} >> .env
echo SUPABASE_ANON_KEY=${{ secrets.SUPABASE_ANON_KEY }} >> .envAfter you commit and push the new yaml, and after you setup the GitHub Secrets, your CI workflow now can be run as expected and help you auto run test and generate report for any PR in your repository.
Any comments? Leave a message or you can find me in contact page 😶