
Table of Contents
Preface
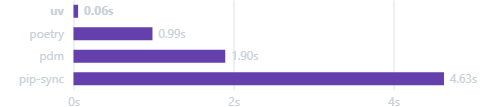
Python developers often rely on virtual environments and package managers to keep projects organized and reproducible. A recent new tool called uv has emerged as an alternative to traditional solutions like venv, virtualenv, and poetry. The earliest package release can be dated back to Feb 2024 and now it already has over 210 releases and 66.3K stars! In this post, we’ll explore uv, its pros and cons, and demonstrate a step-by-step Python project setup as an example.
Why Use uv?
Managing dependencies across multiple Python projects can be cumbersome. Traditional tools like venv require manual activation, while poetry or pipenv have more features but can be heavy or opinionated. uv aims to simplify project setup, virtual environment management, and reproducible environments in a lightweight, user-friendly way.
Pros
- Lightweight and fast
- Easy creation and management of project-specific virtual environments
- Supports multiple Python versions easily
- Built-in seeding mechanism for reproducible environments
As for the cons, actually there are currently none that I can think of. One article from Bite Code, “A year of uv: pros, cons, and should you migrate (Feb 2025)”, has concluded the pros and cons of uv well, and it also has nothing critical to say about the apparent disadvantages of using uv. The only suggestion will be that always try uv first in the project, and only if that fails we turn back to the original way of managing the dependency in the project.
Step-by-Step Example: Python Project with uv
Let’s create a small Python project using uv. The demo has also been uploaded to my GitHub called myuvdemo repo.
Step 1: Intall uv
There are many ways of installing uv, for example, via curl, wget, brew, winget, scoop, pipx, or docker. For more details, please refer to the official documentation Installing uv.
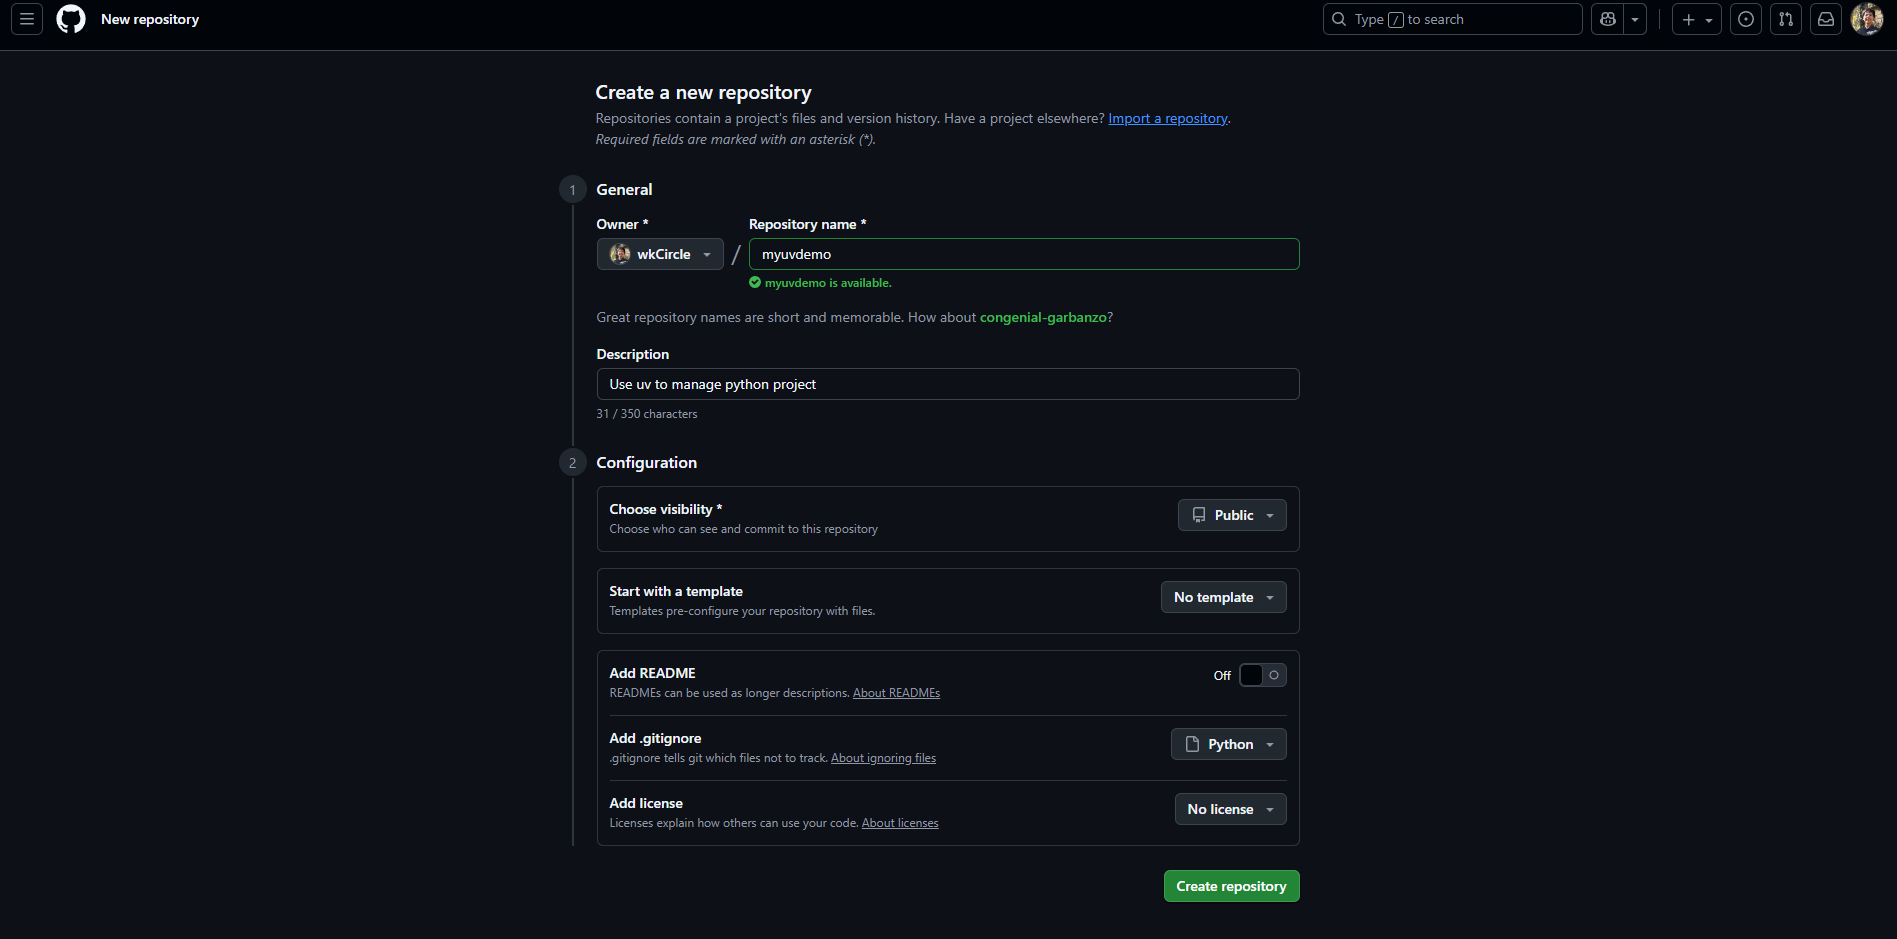
Step 2: Create a GitHub repo.
Go to your GitHub and create a new repository, then copy the repo address and git clone it to your local machine. For my example, I have created a repo called myuvdemo via GitHub. Afterwards, I clone it to my computer via the following command:
git clone https://github.com/wkCircle/myuvdemo.gitStep 3: Initialize uv within the project scope
Change the current directory (cd) into the repository in the terminal and initialize uv with the desired python version.
cd myuvdemo
uv init --python 3.12Afterwards, we will see that 4 additional files have been added to the repo directory: README.md, main.py, pyproject.toml, and.python-version. We can check the list of files including the hidden ones under the current directory via ls -a command in bash terminal.
README.md: an empty file that is used to provide repo documentation.main.py: the main python script file but currently contains only the template code with a print function..python-version: a hidden file that tells uv the default Python version for the current repo. To check this, we can use the commandcat .python-versionto print out the file content, in my case it is “3.12”. This file doesn’t need to be uploaded to GitHub and can be put into.gitignore.pyproject.toml: the most important file that uv uses to describe the current project, python version, and to mange package dependencies in the first place.
pyproject.toml initially contains the following information of key-value pairs format:
[project]
name = "myuvdemo"
version = "0.1.0"
description = "Add your description here"
readme = "README.md"
requires-python = ">=3.12"
dependencies = []The official uv website also describes what each file is doing, you can find more information here in Working on projects, uv.
Step 4: Add packages
Now if we want to add pandas, numpy, and matplotlib into the current repo environment, we can use the following command:
uv add pandas numpy matplotlibuv will install these packages as well as dependent packages into a virtual environment folder .venv:

If we check the directory again using ls -a, then we see that .venv folder, uv.lock has been added, and actually pyproject.toml has also been updated.
.venv: is the dedicated virtual environment that contains the downloaded packages and the python executable file with the correct python version that we specify earlier.uv.lock: is a file that stores information about all package dependencies of the virtual envrionment. It is cross-platform applicable and should not be modified manually. E.g., all 14 packages listed in the screenshot above will appear in the lock file.pyproject.toml: the dependencies key will get updated by recording the main packages that user specify when executing theuv addcommand. In our example, the updated pyproject.toml will look like:
[project]
name = "myuvdemo"
version = "0.1.0"
description = "Add your description here"
readme = "README.md"
requires-python = ">=3.12"
dependencies = [
    "matplotlib>=3.10.6",
    "numpy>=2.3.2",
    "pandas>=2.3.2",
]
While both pyproject.toml and uv.lock record dependencies, pyproject.toml record only the direct packages that user explicitly specify to install and uv.lock includes all packages that are either the direct packages the user specified, or the indirect packages that support the direct packages. According to Real Python article Managing Python Projects With uv: An All-in-One Solution, these are referred to as direct dependencies and transitive dependencies respectively.
Similarly, to remove a package from existing venv, we can simply use uv remove command, e.g.:
uv remove numpyStep 5: run python script
We modify the main.py with the following code as an example:
# main.py
import pandas as pd
from matplotlib import pyplot as plt
def main():
print("Hello from main function!")
print("Creating a df...")
df = pd.DataFrame({'idx': [1, 2, 3, 4, 5], 'y': [1, 1, 10, 20, 60]})
print("Plotting the df")
df.plot()
plt.show()
if __name__ == "__main__":
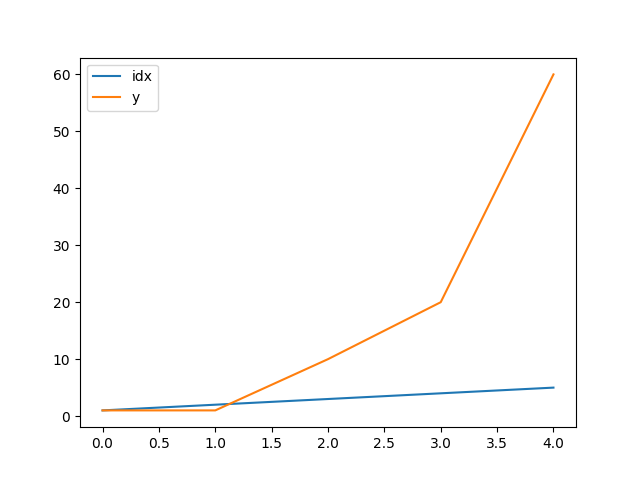
main()And then use the following command to execute the script:
uv run main.pyOnce executed, we will receive the following output and the generated figure:

uv run command will automatically use the correct venv to run the script. If you use a different command other than using uv, e..g, python main.py, you might probably be using a different python coming somewhere else from your system and might end up having an error such as Module Not Found Error. It is best to always make sure using uv command to run the script so you won’t mistakenly use a wrong one.
Step 6: upgrade and/or remove packages
When packages are too old and we want to use the latest version, simply type the following command:
uv add --upgrade <package_name>And when a package is no longer needed, we can remove them to keep a clean envrionment:
uv remove <package_name>Short Summary
Through Step 1-6, we have built a dedicated virtual environment with package dependency management via uv and can execute the script successfully. Congrats! But there are more advanced usage of uv that helps to further maintain the environment!
Reproduce the same venv
When there are multiple developers who want to work on the same project, they also need to install uv and reproduce the same venv before running the python scripts. But how can they do that? Which file are needed for them to reproduce the same environment on their computers?
The answer is uv.lock and pyproject.toml these two files. As long as they are maintained are uploaded by GitHub, the other developers can simply use these two files to reproduce the same venv via the following command:
uv run <any of your .py file>You will find that uv automatically installs the virtual environment in .venv/ folder if there is no existing one before executing the python script. When you run the uv run command again, there is no longer the venv installation since the current one already exist and uv will just directly execute the python script.
Alternatively, we can also use the following command:
uv lock
uv syncthe first line helps creating a lock file (if not existed) or updating it (if existed), and the second line reads pyproject.toml and uv.lock, then create the .venv/ folder (if not existed) or update it (if existed).
Manage packages in different dependency groups
Because different packages have different purpose to be installed in to the current project, we can manage them better by putting them into different dependency groups so that when it comes to testing stage or deployment stage of your project, you can choose to install only certain groups of them to keep a clean and maintainable environment everywhere.
For example, you wish to use develop a front-end beautiful website which provides users some chart analysis and insights. Then during the development phase you would likely to install not just the pandas, numpy, matplotlib etc to help you achieve your goal, but also tools such as pre-commit, pytest to help make your code robust and speed you up (by Continuous Integration, e.g., Setup CI with GitHub Actions for Flutter). However, during the production/deployment phase, you don’t need these testing tools but just the core packages. Therefore, having those packages being categorized into different dependency groups beforehand would help the partial installation at the deployment stage and thus reduce installation time, keep deployment environment clean etc.
To achieve the idea described above, we can, for example, put those packages into main dependency and those testing packages into dev dependency.
When we use uv add <package_name>, by default uv installs the package into main dependency:
# add core packages to main dependency
uv add pandas numpy matplotlibWhen we want to add other packages into another group dependency, use --group argument:
# add testing packages to dev dependency
uv add --group dev pre-commit pytestAfterwards, the pyproject.toml and uv.lock will be updated and contain the information that which package belongs to which group. For example, pyporject.toml will have the following content:
[project]
name = "myuvdemo"
version = "0.1.0"
description = "Add your description here"
readme = "README.md"
requires-python = ">=3.12"
dependencies = [
    "matplotlib>=3.10.6",
    "numpy>=2.3.2",
    "pandas>=2.3.2",
]
[dependency-groups]
dev = [
"pre-commit>=4.3.0",
"pytest>=8.4.2",
]
Now, when it comes to reproducing the same environment, pay attention that uv sync by default installs only the main and dev dependency packages.
- uv reads development dependencies from the [dependency-groups] table (as defined in PEP 735).
- uv does not sync extras by default. However, The
devgroup is special-cased and synced by default. See the default groups documentation for details on changing the defaults.
For more details please refer to uv sync with extraneous packages, Offical uv Website.
To include extra groups, use extra command:
uv sync --extra <group_name>Since dev group is a special one and is included in syncing by default, there are corresponding commands to handle it.
- The
--no-devflag can be used to exclude thedevgroup. - The
--only-devflag can be used to install thedevgroup without the project and its dependencies. - For example, to include main and foo dependency groups but not the dev, one can use
uv sync --no-dev --extra foo
Summary
uv is a modern, lightweight tool that simplifies Python project setup and dependency management. Unlike traditional solutions, it combines speed with reproducibility, making it easier to keep environments consistent across different machines. With commands like uv add, uv lock, and uv sync, you can quickly manage dependencies, organize them into groups, and share reproducible environments with collaborators. To run a python script, the command is also easy with uv run.
Whether you’re setting up a small side project or collaborating on a larger codebase, uv provides a clean and efficient workflow that reduces friction and helps keep your Python projects maintainable.
References
- GitHub repo myuvdemo, my repository for uv demo purpose.
- Installing uv, Official uv Website.
- Working on projects, uv, Official uv Website.
- uv sync with extraneous packages, Offical uv Website.
- “A year of uv: pros, cons, and should you migrate (Feb 2025)”, Bite Code.
- Managing Python Projects With uv: An All-in-One Solution, Real Python.